• Welcome
    • Specs & history
    • The first meeting
    • Who are we
  • Maintenance
    • Winter 2006 - 2007
      • Hull and superstructure
      • Cabin and wheelhouse
      • Engine and driveline
    • Restoration 2007 - 2010
      • Manufacturing a new boat tent
      • Engine renovation
      • Removing the old varnish
      • Wheelhouse repair
      • Repair of side deck, transom and aft deck
      • Repair of deckhouse and foredeck
      • Skylight repair
      • Cabin restoration
      • Aft cabin repairs
      • New Dorade boxes
      • New wheelhouse roof
      • Oil treatment & varnishing
      • Caulking of decks, wheelhouse roof, and edges
      • New handrails
      • Assembly, hull & preparation for launch
      • Launch & return trip
    • The years 2010 - 2017
      • Winter 2010 - 2011
      • 2010: More varnish
      • 2010: New nameplate
      • 2010: Renovation of the propeller shaft and bearings
      • Winter 2011 - 2012
      • 2011: Varnish repairs
      • 2011: Repair of the lower fender moldings
      • Winter 2012 - 2013
      • Winter 2013 - 2014
      • 2013: Storm-damaged boat tent
      • 2013: Tasks for Winter and spring
      • The years 2015-2017
    • Renovation 2017 - 2019
      • It’s time to scrape
      • New scaffold and sanding
      • Repairs to the superstructure
      • Application of Coelan
    • Winter 2019 - 2020
      • First year experience with Coelan
  • Gallery
    • Pictures from 2006-2007
    • From the restauration
    • Pictures from 2010
    • Pictures from 2011
    • Pictures from 2012
    • Pictures from 2013
    • Pictures from 2014
    • Pictures from 2015
    • Pictures from 2016
    • Pictures from 2017
    • Pictures from 2019
  • The old days
    • From the shipyard
    • Mostly from the 50s
Vælg dansk sprog

Wheelhouse repair

Now that the old wheelhouse roof has been removed and the varnish has been scraped off, it's time to begin the reconstruction. I start by repairing and patching the window frames - especially the starboard side is bad, so I take that side first.


Rot in the starboard fore post of the wheelhouse

The lower front corner of the starboard side turned out to be worse than it seemed at first glance, in fact, it is rotten inside about 15 cm up. Furthermore, there was a bit of rot under the fiberglass on the cabin roof, though only approx. 10 cm of the outer plank. So I need to make some patches, and fortunately, I can use the mahogany from the old roof which has roughly the same color.


The boat has sliding windows on the side, which is nice when we sail, but it does have a lot of edges that can absorb moisture. Therefore, they are in a somewhat rough condition and in addition, the posts are glued with Sikaflex, a poor solution that is ugly and not very durable.


April 16, 2008:
I am done patching the window frames - it turned out to be a big puzzle. I have yet to get the wood for the roof and the other repairs, but I hope it will get here next week.


May 6, 2008:
Unfortunately, I have to give up getting the boat in the water in 2008 - I still haven't received the tree I need for the repairs, and have also been delayed for a number of other reasons, among other things work. But on the positive side, this gives me a chance of going a little further with the restoration than I originally had planned, and we can get the boat in the water in April next year and get to enjoy the spring at sea.


Lots of mahogany, oak, Iroko and teak
May 17, 2008:
I finally got the wood for the repairs, so now I can get started with the more serious stuff. I would like to take a few days off of work, so I can get things going - I have been able to do too little this spring, and all the holidays have gone by with doing other stuff - family gatherings and visits, and we also had a gig with the band.


July 24, 2008:

It is necessary to replace a few pieces of wood in the starboard side of the bulkhead, and since I have it all taken apart now, I might as well finish it all on that side. It is a slightly messy repair

The main bulkhead taken apart

 because the bulkhead is assembled with a - that is, the plates in the middle are stuck in a in the boards. I took the whole bench apart at the same time because it needs an overhaul too, and removing it makes more room to work with the bulkhead.


I decided to change the design a bit - there is a 90 x 25 mm post on each side behind the side windows, which doesn't look particularly good and I believe it is an "overkill" - they are too strong. Furthermore, the posts are very much in the way, especially on the aft side of the table. So I intend to remove them and make new smaller ones instead.


August 7, 2008:
I wish the holidays weren't over already, but I need to make sure we have bread on the table. The renovation of the bench is progressing slowly but steadily moving forward, but it is certainly time-consuming. I had to mount the cooling element for the refrigerator inside the bench while I assembled the floor because the pipes can not be separated. I have now finished the benchtop and cleaned the old hatch, so now there are only minor details left to take care of before the bench is finished.

New bench and brackets on the starboard side


August 24, 2008:
Now the refrigerator box is done and I have made new brackets for the starboard side moldings. I have to make brand new moldings on both sides because of the changed bracing. I have been a bit handicapped because my planer had to be repaired, and it is difficult to finish the moldings without it.


I have already cut them on the table saw, and as soon as I get my planer back, I'll finish them. Meanwhile, I'm patching the rear post on the starboard side, which has a lot of rot. It was difficult to see before the bracing came off. After that, I only have to mount the new bracing and moldings, then everything on the starboard side is ready to be saturated with Owatrol D1.


The top of the wind shield corrected

June 15, 2009:
For the past 3 weeks, I have been working mostly on the wheelhouse. I have straightened the top of the front edge by gluing a few oak strips on top of it and planing it in shape, just as the corners have been patched and adjusted. I have also made the new oak beams and got them fitted. The beams are glued together by six 10 x 45 mm moldings, and I made the curve template by screwing wood pieces onto a 19 mm plywood board.


I used the same template to make the aft mahogany plank of the roof - it is glued together by three 8 x 200 mm planks which, after it's fitted to the roof, will be cut down to 160 mm in a slight rounding. It is necessary to make the plank that way because there is no beam underneath to support it - the plank must have the rounding in advance.


Template for the new beams
The lists for the beams in the template
The beams planed and sanded
The beams mounted


I have also made and mounted the stiffeners on the stern posts as well as the patched the post on the port side. So everything is ready for making the roof, but there are still some things that are easier to do before making the roof. So I'm making the moldings for the sliding windows, which are made of 35 x 5 mm mahogany, and also the top support for the sliding window, which an oak list with a .


Since I have decided to wait until next year to launch, I have now started to fix the helm chair and helm so that I can varnish it all at once.


New moldings

July 21, 2009
I have been relaxing a little over the last month, but I am now finished fixing the helm chair, engine box, and helm. I also made and mounted the many 50 x 8 mm moldings on both sides, and made the seat arrangement behind the helm chair. So now there's not much left to do in the wheelhouse.


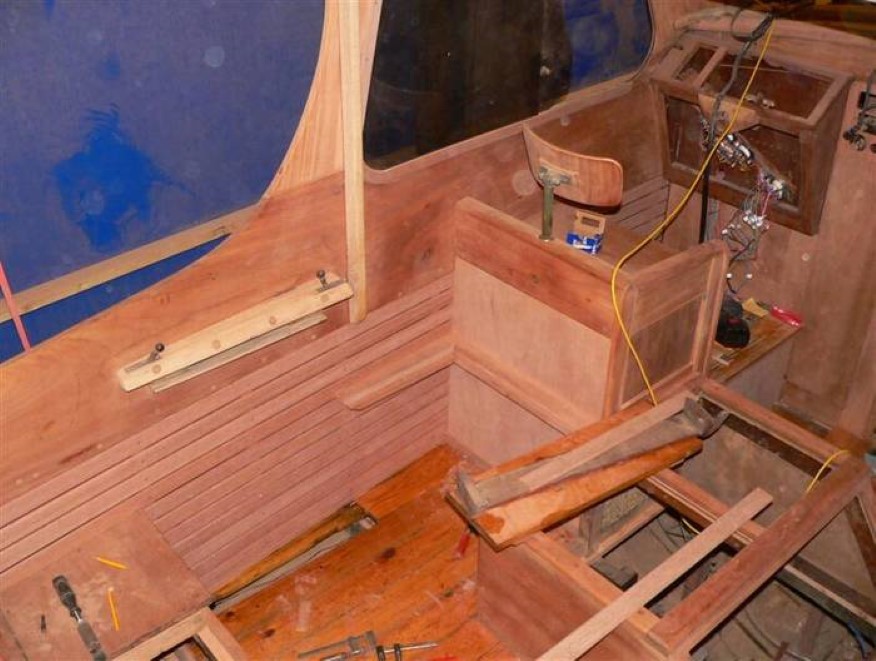
The moldings were cut from a 3.5 meter long piece of mahogany of 120 x 70 mm, then planed down to a thickness of 8 mm and the edges rounded with the router. Eventually, the moldings have been sanded with sandpaper - all in all a lot of work. The mounting, on the other hand, was quite easy, it was just a matter of measuring properly and be accurate.


Correcting and repairing the wheelchair and engine box was not the easiest job. Both were very skewed and I had to compromise to keep the old parts. But it's not supposed to be a new boat, so I'm fine with that. I had to take the helm chair completely apart and reassemble it in order to correct the skewness. I made a new handrail on the side of it and extended it down to the floor. The footstool, which previously contained the gasoline tank, has also been corrected and will now function as the boat's battery box.


Seat arrangement behind the helm chair

The engine box had to be patched where the old switch from petrol to gasoline was located and the whole box has been raised 8 mm in the starboard side so that it better aligns with the aft bench. The engine box forms one side of the seat behind the helm chair, and a new arrangement was needed. I made it with hidden brackets.


I'm not done with the correcting the helm yet, I am considering to make a new dashboard - the one I made a couple of years ago is a little impractical in regards to the wires and connections. I haven't decided yet though.


The boat has it's face again

August 1, 2009:
Finally, the wheelhouse is finished. I decided not to make a new dashboard this time around, I found a solution that makes working with the wires a little easier. But the helm itself is corrected, sanded and mounted, and the very last patch in the post on the port side has been glued in.


The boat has now also gotten its "face" back - the moldings for the windshields. It was not an easy job with all the different angles, but it all went very well. I expect to mount the windows with butyl sealant, and the moldings in plenty of Ettan (a Swedish sealant based on tree-tar and linseed oil, which never ifies). It'll be able to keep the water out, and also make it possible to take it apart again without destroying the moldings.


The next project is the wheelhouse roof.


Den øverste indvendige kant af vinduesrammen er udskiftet Begge samlinger har fået lister og der er sat et par lus i siden Den grimme lus i siden er udskiftet med en der passer Øverste samling har fået en liste Hjørnet i styrbord side er blevet repareret Liste i samling i agterste stolpe i bagbord side Overkanten af vinduet i bagbord side er repareret Foreste hjørne og stolpe i bagbord side er blevet luset Liste i indvendig i agterste stolpe i bagbord side Forkanten af styrehuset er ved at være klar Samlingerne er pakket med brun Tec7 Hjørnet i styrbord side er nu klar Tilpasning af nyt træ til hovedskottet Forkanten til kistebænken ved at blive afrenset En gang slibning pynter nu meget Det færdige skot Mahogniplade limes på det nederste panel til skottet Det nederste pamel er nyt Den gamle låge er blevet afrenset Tilpasning af ny gavl Der skal være køleboks i den agterste halvdel af kistebænken. Boksen bliver isoleret med 50mm flamingo Tilpasning af gavl Sådan kommer den til at se ud når den er færdig Kun lågen og forkanten med panelerne er genbrugt Jeg er gået i gang med at afrense agterenden af cockpittet Køleboksen er ved at være færdig - jeg mangler kun at male den indvendig Det kostede godt nok den ene ende af kistebænken, men det går nok Så er der smurt med Owatrol indvendigt Jeg har monteret nye bæringer til listerne. Den agterste stolpe er noget medtaget, så den får lige en lus (mere). Epoxy er godt... Så er der slebet - stolpen er klar Det er lidt af et puslespil, men når først det er bejdset og lakeret, ses det ikke meget Ser er skiftet et stort stykke i toppen af stolpen Det ses nu ikke så meget Skabelon af dæksrundingen Så meget var den gamle agterste bjælke for lav Klar til at lime Så er der spændt op Tre splinternye bjælker Så er lakken fjernet fra den agterste kistebænk, og den er slebet Bagbord stolpe er luset Lusningen udvendig Den agterste planke til styrehustaget limes sammen Hjørnerne på forkanten luses Lidt mere lusning Overkanten er repareret med en liste Færdigt hjørne Nye afstivninger fremstilles Afstivningen monteret Så er det meste på plads Ny vinduesramme Lidt tættere på Vinduesrammen er klar i bagbord side Styrepulten rettes op Styrestolen er blevet skilt ad Reparation af finér på ryglæn - det skulle have været teak, men jeg havde kun mahognifinér Styrestolen er næsten samlet igen Det ligner sig selv - blot ikke så skævt Der er kommet en ny håndliste på Montering af lister i styrbord side Tilpasningen rundt op kistebænken i styrbord side Så er listerne monteret i styrbord side Overblik i styrbord side Reparation af motorkasse Jeg skal have fat i nogle nye dørkringe med fjeder til klapperne Sædearrangement i bagbord side Sædearrangement lidt tættere på - hakket i sædet er på grund af bordet Montering af lister i bagbord side Tilpasning rundt om sædearrangementet Så hjælper det på det... Foran styrestolen Styrepulten er klar 100% flugtning kunne det ikke blive til, men det er acceptabelt Afsluttende hjørneliste Tilpasning af vindueslister Nye vindueslister #1 Nye vindueslister #2 Nu begynder den at ligne sig selv
Motorbåden Selma III
Hjemhavn: Ribe  •  Tlf.: +45 75173059  •  
Medlem af DFÆL Logo Dansk Forening for Ældre Lystfartøjer